
In a previous article we covered the basics of docker images usage. But there we used images built by others. That's great if you find the image you look for, but what happens if none fits your needs?
In this article we are going to explain how to create your own images and upload them to Docker Hub so they can be easily downloaded in your projects environments and shared with other developers.
To cook you need a recipe
Provided that you followed the tutorial previously linked, you'll have docker already installed in your linux box. Once docker is installed you need a recipe to tell it how to "cook" your image. That recipe is a file called Dockerfile that you'll create in a folder of your choice with any files you want to include in your image.
What you cook with that recipe? An image, but what is a docker image? A docker image is a ready to use virtual linux operating system with a specific configuration and set of dependencies installed. How you use that image is up to you. Some images are provided "as-is", as a base point where you are supposed to install your application and run it inside. Other images are more specific and contains an app that is executed as soon you run that image. Just keep in your mind that a docker image is like what an OOP language calls a "class", while a container is an instance of that class (an OOP language would call it an "object"). You may have many containers running after being started from the same image.
To understand how a Dockerfile works, we are going to asses some examples.
Let's start with this Dockerfile from the vdist project. The image you build with that Dockerfile is intended to compile a python distribution and run an application called fpm over a folder is created at runtime when an image container is used. So, this Dockerfile is supposed to install every dependency to make possible compiling python and running fpm.
As a first step, every Dockerfile starts defining which image you are going to use as starting point. Following with the OOP metaphor, being our image a class, we need to define from which class inherits ours.
In this case, our image is derived from ubuntu:latest image, but you can use any image available at Docker Hub. Just take care to check that image Docker Hub page to find out which tag to use. Once you upload your image to Docker Hub others may use it as a base point for their respective images.
Every art piece must be signed. Your image is no different so you should define some metadata for it:
The real match comes with RUN commands. Those are what you use to configure your image.
Some people misunderstand what RUN commands are intended for the first time they try to build a docker image. RUN commands are not executed when a container is created from an image with "docker run" command. Instead they are run only once by "docker build" to create an image from a Dockerfile.

The exact set of RUN command will vary depending of your respective project needs. In this example RUN commands check apt sources list are OK, update apt database and install a bunch of dependencies using both "apt-get" and "gem install".
However, you'd better start your bunch of RUN commands with a "RUN set -e" this will make fail your entire image building process if any RUN command returns and error. May seem an extreme measure, but that way you are sure you are not uploading an image with unadvertised errors.
Besides, when you review some Dockerfiles from other project you will find many of them include several shell commands inside the same RUN command as our example does in lines 14-16. Docker people recommends including inside the same RUN command a bunch of shell commands if they are related between them (i.e. if two commands have no sense separated, being executed without the other, they should be run inside the same RUN command). That's because of how images are built using a layer structure where every RUN command is a separate layer. Following Docker people advise, your images should be quicker to rebuilt when you perform any change over its Dockerfile. So to include several shell commands inside the same RUN command, remember to separate those commands in a line for each and append every line with a "&& \" to chain them (except the last line as the example shows).
Apart of RUN commands, there are others you should know. Let's review the Dockerfile from my project markdown2man. That image is intended to run a python script to use Pandoc to make a file conversion using arguments passed by the user when a container is started from that image. So, to create that image you can find some now already familiar commands:


Time to cook
dante@Camelot:~/Projects/markdown2man$ docker build -t dantesignal31/markdown2man:latest .
Sending build context to Docker daemon  20.42MB
Step 1/14 : FROM python:3.8
 ---> 67ec76d9f73b
Step 2/14 : LABEL maintainer="dante-signal31 (dante.signal31@gmail.com)"
 ---> Using cache
 ---> ca94c01e56af
Step 3/14 : LABEL description="Image to run markdown2man GitHub Action."
 ---> Using cache
 ---> b749bd5d4bab
Step 4/14 : LABEL homepage="https://github.com/dante-signal31/markdown2man"
 ---> Using cache
 ---> 0869d30775e0
Step 5/14 : RUN set -e
 ---> Using cache
 ---> 381750ae4a4f
Step 6/14 : RUN apt-get update     && apt-get install pandoc -y
 ---> Using cache
 ---> 8538fe6f0c06
Step 7/14 : ENV SCRIPT_PATH /script
 ---> Using cache
 ---> 25b4b27451c6
Step 8/14 : COPY requirements.txt $SCRIPT_PATH/
 ---> Using cache
 ---> 03c97cc6fce4
Step 9/14 : RUN pip install --no-cache-dir -r $SCRIPT_PATH/requirements.txt
 ---> Using cache
 ---> ccb0ee22664d
Step 10/14 : COPY src/lib/* $SCRIPT_PATH/lib/
 ---> d447ceaa00db
Step 11/14 : COPY src/markdown2man.py $SCRIPT_PATH/
 ---> 923dd9c2c1d0
Step 12/14 : RUN chmod 755 $SCRIPT_PATH/markdown2man.py
 ---> Running in 30d8cf7e0586
Removing intermediate container 30d8cf7e0586
 ---> f8386844eab5
Step 13/14 : RUN ln -s $SCRIPT_PATH/markdown2man.py /usr/bin/markdown2man
 ---> Running in aa612bf91a2a
Removing intermediate container aa612bf91a2a
 ---> 40da567a99b9
Step 14/14 : ENTRYPOINT ["markdown2man"]
 ---> Running in aaa4774f9a1a
Removing intermediate container aaa4774f9a1a
 ---> 16baba45e7aa
Successfully built 16baba45e7aa
Successfully tagged dantesignal31/markdown2man:latest

dante@Camelot:~$
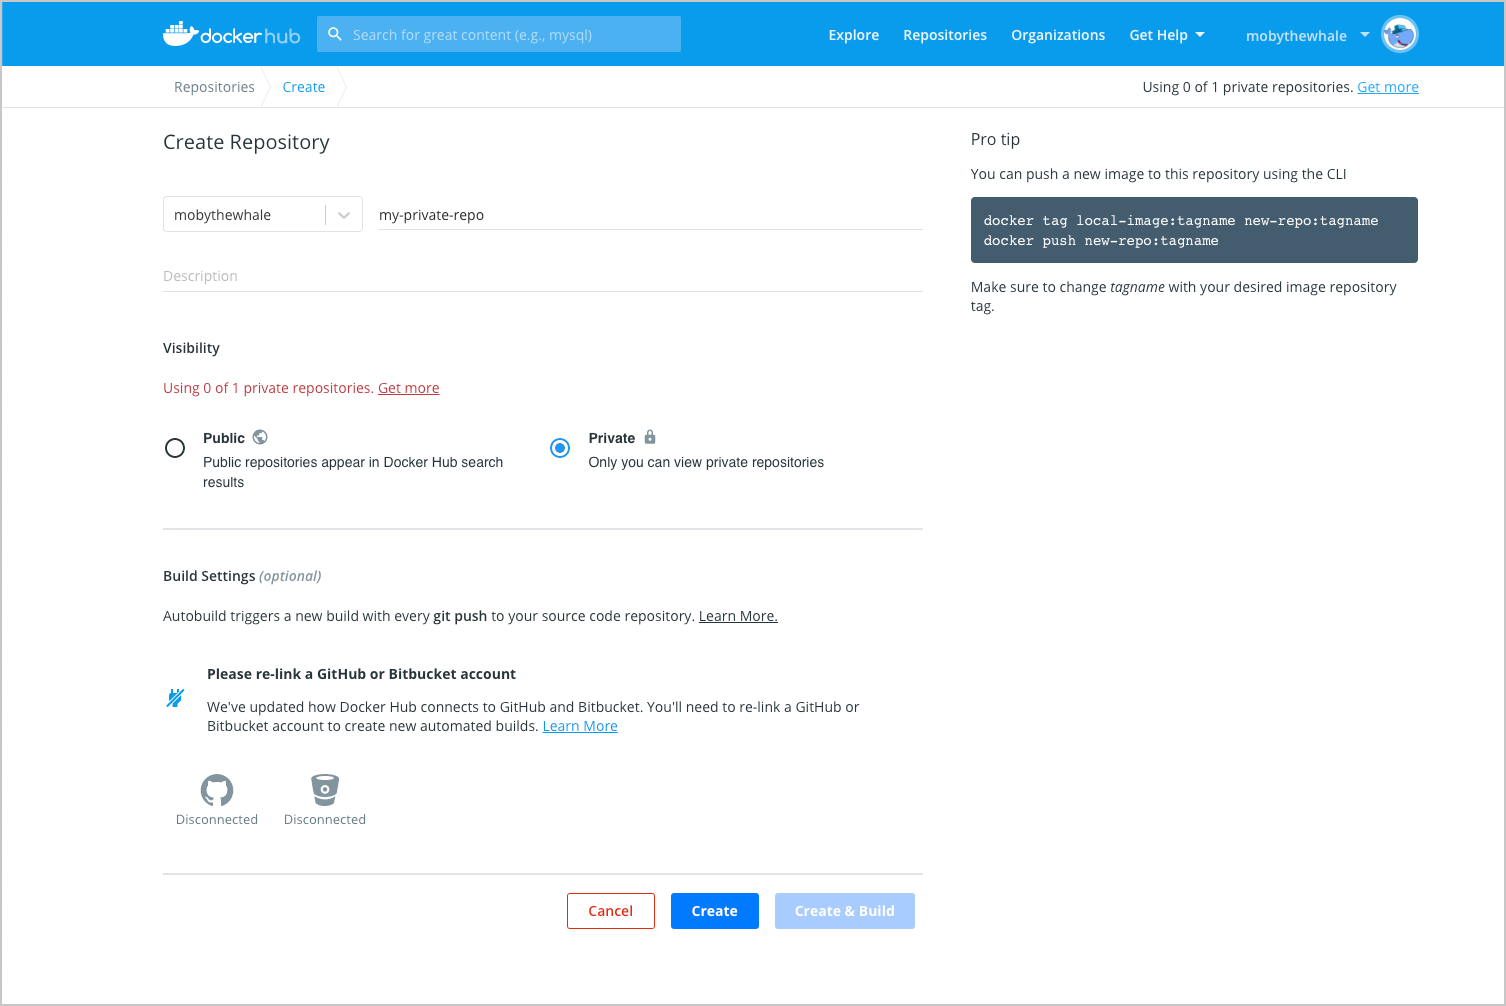
Upload your image to Docker Hub
dante@Camelot:~/Projects/markdown2man$ docker images
REPOSITORY                   TAG                 IMAGE ID       CREATED          SIZE
dantesignal31/markdown2man   latest              16baba45e7aa   15 minutes ago   1.11GB


dante@Camelot:~$
dante@Camelot:~/Projects/markdown2man$ docker login
Authenticating with existing credentials...
WARNING! Your password will be stored unencrypted in /home/dante/.docker/config.json.
Configure a credential helper to remove this warning. See
https://docs.docker.com/engine/reference/commandline/login/#credentials-store

Login Succeeded
dante@Camelot:~$
dante@Camelot:~/Projects/markdown2man$ docker push dantesignal31/markdown2man:latest
The push refers to repository [docker.io/dantesignal31/markdown2man]
05271d7777b6: Pushed
67b7e520b6c7: Pushed
90ccec97ca8c: Pushed
f8ffd19ea9bf: Pushed
d637246b9604: Pushed
16c591e22029: Pushed
1a4ca4e12765: Pushed
e9df9d3bdd45: Mounted from library/python
1271cc224a6b: Mounted from library/python
740ef99eafe1: Mounted from library/python
b7b662b31e70: Mounted from library/python
6f5234c0aacd: Mounted from library/python
8a5844586fdb: Mounted from library/python
a4aba4e59b40: Mounted from library/python
5499f2905579: Mounted from library/python
a36ba9e322f7: Mounted from library/debian
latest: digest: sha256:3e2a65f043306cc33e4504a5acb2728f675713c2c24de0b1a4bc970ae79b9ec8 size: 3680

dante@Camelot:~$