26 May 2024

Course "Godot 4 Multiplayer: Make Your Own Online Game" by GameDev.TV

A few days ago, I finished the course that gives this article its title, and now I’m ready to share my thoughts on it. I took the course on Udemy. It’s also available on GameDevTV’s own platform, but since I already have other courses on various topics on Udemy, I prefer to keep buying them there to have everything in one place. Another advantage of Udemy is that it often has English subtitles, which can be a lifesaver if the instructor has a very thick accent. In theory, GameDevTV’s platform should allow you to enable subtitles, but I haven’t seen how in the few courses I have there.

On Udemy, the course is advertised as covering the following topics:

  • Building an online multiplayer game using the Godot 4 libraries.
  • Creating common multiplayer game mechanics such as switch tiles, movable objects, unlockable doors, etc.
  • Synchronizing these mechanics over the internet to allow players to interact and collaborate to overcome challenges.
  • Using W4 Games' infrastructure to enable players to connect even if they are not on the same local network.

The game developed to explain these principles is a simple 2D platformer, where 2 players can collaborate to reach switch tiles that open doors and create bridges, allowing access to previously unreachable areas. It also includes a mechanic for opening a chest to collect a key that unlocks the level’s end gate. As you can see, the game itself is very simple, but it covers a range of very common mechanics in this type of game.

The entire first section of the course is dedicated to shaping the base game. If you haven’t touched Godot in a while, it can serve as a refresher. If you’ve never used Godot, it can also work as an introductory tutorial.

In the second section, the implementation of player connectivity within the same local network begins. It turns out that Godot only needs 2 specialized nodes to offer a complete multiplayer experience. This simplicity and elegance speak volumes about this engine. With those 2 specialized nodes and RPC calls from the code, you have everything you need to set up your online game.

The third section, the longest, explains how to apply the concepts from the previous section so that the different game mechanics can be synchronized for all players at the same time, ensuring they always see the same game state.

The course implements its code in GDScript, but I followed along by implementing my code in C# and had no issues.

The instructor explains very well, his pronunciation is good, and he doesn’t ramble. The project chosen to support his explanations is simple enough not to be complicated, but more than enough to cover the most common mechanics usually implemented in a platformer. By the end of the course, you have a pretty good idea of how to structure a basic multiplayer game.

However, there are areas for improvement. For starters, Godot's multiplayer tools (the 2 nodes and RPC calls) are covered in a very practical manner, which isn’t bad, but I was left wanting more theoretical depth. You end up guessing what each thing does, but not with the confidence of knowing what it does internally. For example, RPC calls are extensively covered and used in the course, but I would have liked more in-depth explanations on their general functioning and how they would be used in other contexts.

Another area for improvement is that despite mentioning W4 Games' services, they are not mentioned at all in the course. It’s true that the fine print warns that these contents are not yet available and will come later, but W4 Games has long since opened its beta for people to try out their services. I expected that by now they would have included that part in the course, or at least said when they would. None of this has happened, and that’s why I didn’t give it 5 stars on Udemy. If they eventually include the section explaining how to use W4 Games' services, I will revise my rating upward.

Despite this, the course is highly recommended, though not at the full price advertised on Udemy and GameDevTV. My advice is to wait until it’s on sale on either of these platforms to buy it. I’m not sure about GameDevTV, but on Udemy, sales are very frequent, so my advice is not to make the rookie mistake of buying it for €50 or €90 when it’s very often on sale for €10 or €15.

08 May 2024

"Programming Game AI by Example" by Mat Buckland

It's not easy to find good books on artificial intelligence (AI) applied to games. Most of them don't go beyond the introductory level, and when they explain the A* algorithm, they consider it advanced material and leave it there. In my opinion, the real gem in this field is Ian Millington's "AI for Games," which combines vast content with clear, detailed explanations that are truly relevant to game development. Since I read it, I hadn't come across another work that could compare until I stumbled upon the one we're discussing in this article. It's worth noting that Buckland's work was one of Millington's references.

While "Programming AI by Example" may not match the breadth of content in "AI for Games," it certainly delves into the topics it covers with great depth and clarity. It's also worth noting that it addresses several topics absent from Millington's work, such as integrating scripting systems into our games (to simplify AI algorithm design) and the chapter on goal-driven agents.

The book is filled with good illustrative figures that aid comprehension.

Unlike Millington, the implementations are illustrated not in pseudocode but in C++, which, in my opinion, is a downside because it's not exactly the most intuitive language in the world. However, the explanations are extensive and clear enough that a full understanding of the code is not essential.

I also noticed the emphasis on showing UML diagrams of the class hierarchies of the different implementations. I understand why this is done, and it's not excessive, but it made me smile because it feels somewhat outdated. UML diagrams are not commonly seen in books anymore.

Despite all these signs of the time elapsed since the book was published, the field of AI for games has not advanced so much as to render its content obsolete. The principles it covers remain relevant. If anything, some tools that have emerged later, such as behavior trees or neural learning, are missing.

In conclusion, I found the book excellent. I recommend reading it before Millington's. That way, you can enhance its usefulness as an introductory piece to facilitate later understanding of Millington's work and expand on what Buckland leaves pending. With this approach, I believe you'll cover the best of what has been written so far in the field of AI for games.

07 May 2024

How to implement a MiniMap in Godot

A few days ago, I published an article about a Godot course I had just finished on Udemy. It was about a 2.5D action game, so even though the course itself didn't cover it, I thought it was the perfect foundation for learning how to make MiniMaps in Godot.

As you may know, a MiniMap is a small window included in many games to show where the character is within the level. You have an example in the image that opens this article, corresponding to the MiniMap of World of Warcraft.

It turns out that implementing a basic MiniMap in Godot is very easy and, in its most basic version, doesn't even require code. Let's start by explaining how to implement a stationary MiniMap and from there we'll progressively sophisticate it by adding the following features:

  1. We'll make the MiniMap move following the main character.
  2. We'll represent the character and its surroundings with icons inside the MiniMap.
  3. We'll see how to make the MiniMap round.
  4. We'll adorn the MiniMap with a border.
  5. Basic stationary MiniMap

Basic stationary MiniMap

This MiniMap doesn't move with the character but shows a section of the scenario. It only makes sense if our level is very small and can be entirely shown within the MiniMap. Still, despite its limited usefulness, it's the basis from which all MiniMaps start.

To implement it, we'll need to add the following nodes to the hierarchy of our scene:

The SubViewportContainer node will allow us to anchor the MiniMap to the area of the screen where we want it to be located by simply selecting that node and setting its anchoring in the main view tab:

Once the MiniMap is placed, you'll probably want to define its size. To do that, you need to first set the size of the SubViewport node, responsible for showing the camera view. To do this, select that node and configure the Size property.


It's possible that after resizing the SubViewport node, you'll need to re-set the anchoring of the SubViewportContainer node.

Once that's done, we'll have a window, overlaid on the main game window, that will show what the third node focuses on: the camera view. What we'll need to do is to place that camera over the scenario, focusing vertically. I usually set up this camera in orthogonal projection because it makes the MiniMap clearer. With its Size parameter, we can encompass more or less of the scenario within the focus. Finally, it's important to uncheck the Current parameter so as not to override the main game's main camera function. Ultimately, those camera parameters can look like this:


At this point, we'll have the most basic version of the MiniMap.


However, this MiniMap has many shortcomings that we'll address in the following sections.

Moving MiniMap

The first problem we have at this point is that since the camera doesn't move, we have to give it a gigantic Size so that the entire scenario fits in the MiniMap frame. This reduces its value because the larger the scenario, the more its details will be reduced in the MiniMap. What is normally done in these cases is to reduce the Size of the camera, causing it to focus only on a part of the scenario around the player character and make it follow the character. This way, although the camera doesn't cover the entire scenario, it will provide enough detail of the player's environment, which is what really matters.

To make the MiniMap camera follow the player, you need to add the following script to it:


As you can see, it simply locates the camera in the same position as the player, retaining the initial height at which we would have placed it in the editor. Since we've implemented the _Process() method, the camera's position is updated every frame. The effect will be that the camera will move with the player, focusing on them from above.

The _player field is just a reference that will be passed throug inspector, dragging the scene player object over that field.

Representation with icons of characters and map elements

The next problem will be that, no matter how much we've brought the camera closer, it's very possible that many of the important elements are too small or not clearly visible. To solve this, most MiniMaps represent those elements with icons, as can be seen in the example MiniMap that starts this article.

In my particular case, since my game was 2.5D, the characters were sprites, so being flat, they were invisible when focused from above with the MiniMap camera.

The solution is to add a sprite just above the elements we want to show on the MiniMap. These sprites will display the icon we want to represent those elements.

For example, in my case, I added the sprite of a helmet above my enemies.


Logically, this icon must be on a plane perpendicular to the focus axis of the MiniMap camera so that it can capture it properly. If the MiniMap camera focuses from the Y-axis, the icon will have to rest on the XZ plane.

At this point, the issue will be that these icons are invisible to the main game's main camera and only show up on the MiniMap camera. To solve this, we can use rendering layers.

In my game, I've created the following rendering layers, within Project > Project Settings... > General > Layer Names > 3D Render:


I placed the pieces of the scenario in layer 1, the player character in layer 2, and the enemies in layer 3. This is configured in the VisualInstance3D section of the main sprite of each of the elements. For example, in the case of the sprite representing the player, its configuration is as follows:


For 3D elements, the rendering layer is configured in the MeshInstance section.

As for the markers' icons, both for the player and the enemies, I've left them on layer 4.


To ensure that the main game's main camera doesn't show the MiniMap icons, set its Cull Mask so that it doesn't display the layer where you've placed those icons.

In the case of our example, the main game's main camera has the following Cull Mask:


Considering the layers I had created, the above means that the main game's main camera only shows the scenario (layer 1), the player (layer 2), the enemies (layer 3), but not the MiniMap markers (layer 4).

In contrast, the MiniMap camera's Cull Mask should include the layer where the icons are.

In the example's case, the MiniMap camera has the following configuration:


Note, therefore, that the MiniMap will show the scenario (layer 1) and the marker icons (layer 4). I don't show the player or the enemies because these are already represented by their respective markers.

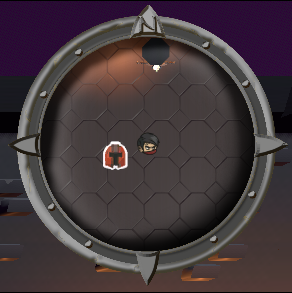
The result will be that the player and enemies will be represented as follows on the MiniMap:


Round MiniMap

At this point, we'll have a functionally complete MiniMap, albeit aesthetically modest.

It may be that in our game, a square MiniMap fits, but how would we do it if we wanted a round MiniMap?

There are several ways to do it. Some prefer to use a shader, but I think it's much simpler to use a mask. This is a sprite that overlays an image to define which parts of the image can be seen and which cannot. The sprite that acts as a mask will define the parts that can be seen with an alpha of 1 (regardless of color) and those that cannot with an alpha of 0 (transparent).

A graphic editor like Gimp may be sufficient to create a mask like the following:


Import the mask image into Godot and associate it with a Sprite2D node that you should place as the parent of the MiniMask:


For the sprite to act as a mask, you must set the Clip Children parameter of its CanvasItem section to Clip Only. This will mask all the nodes that it has as children.


When you reposition the MiniMap nodes under the mask sprite, you may need to ensure that the sizes (Transform-Sizes) of the SubviewPortContainer and Subviewport nodes match. If they don't match, you may only see a portion of the MiniMap.

Also, make sure that the Anchor Preset parameter of the SubViewportContainer is set to FullRect so that it fits the size of the mask sprite.


The problem with this scheme is that the MiniMap will lose automatic anchoring to the screen because the parent of the MiniMap (the mask sprite) will no longer automatically reposition when the game window is resized. In these cases, it's usually a good idea to place the mask sprite (and all its children) under a PanelContainer node so that we can anchor it to the screen position we want.


At this point, the problem will be that the MiniMap will be round, but for some reason, the panel on which it is displayed will not be entirely transparent (zoom in on the photo and look at the edges of the MiniMap):


The cause is that the default style of Godot panels includes making their background not transparent. So, we have to change that. Go to the properties of the PanelContainer and, in the ThemeOverrides > Styles section, create an empty StyleBox resource. This will reset the default values of the Panel Container style, and it will become completely transparent.


MiniMap Border

It's common to give the MiniMap a border to highlight it against the background and to match the general aesthetics of the game. Let's see how to do it.

If we're not artists, we can search the Internet for borders for our MiniMaps. However, I advise you to check the rights of what you find to make sure you can use it in your game. A search for "circular Minimap texture download" terms can offer many examples. One of them is the one I used in this tutorial:


Note that the image must contain an Alpha channel, setting with value 0 all those areas, such as the inside of the ring, through which we want our MiniMap to be visible.

The idea is to place that image over the MiniMap, covering the edges. To do this, we have to add a TextureRect node as a child of the MiniMap's PanelContainer. On this new node, we should drag the border image, which will show it in the editor.

The image may have a size that doesn't fit our MiniMap, so we'll have to resize it. To do this, we must set the Expand Mode parameter of the TextureRect to Ignore Size. From there, we can change the size of the border image by modifying its Custom Minimum Size parameter. We'll probably also have to change the Position and Scale parameters of the MiniMapMask node to resize and center the MiniMap image within the border.

The resulting node scheme will be as follows:


And the result:


Note that, in Godot, the painting order of nodes is from top to bottom of the scene hierarchy. That means that nodes closer to the root are painted first, and then their children. So it's important that the TextureRect is below the MiniMapMask so that the MiniMapMask is painted first, and then the TextureRect. The consequence of this is that the TextureRect will be painted on top of the MiniMapMask node, covering its edges.

Try reversing the order and see the effect.

01 May 2024

"Godot 4 C# Action Adventure: Build your own 2.5D RPG" course review

Throughout the past year, I became interested in Godot as an option for game development. I was content with Unity, but what I was reading about Godot was fascinating to me. I was particularly drawn to its focus on streamlining and speeding up development. Unity is great, but working with it is slow. The constant reloading of the domain with even the slightest script modification and the slow compilation times make the workflow in Unity slower than I would like. The scandal last September, with Unity's unilateral change in terms, made me decide to start learning Godot. I'm not sure if I'll end up developing anything in Godot, but it's always good to have other options if staying with Unity becomes unsustainable, and it's also not bad to broaden the spectrum of engines if you're learning game development, as the concepts you learn in one engine will likely be useful in another.

So, I got down to it, starting with books on Godot, which I've been discussing here. Once I understood the basics, I started looking for courses on Godot to start practicing in a guided way. I had taken GameDevTV courses on Unity before and liked them, so I ended up buying a couple of their courses on Udemy. I know I could buy them on their own platform, but since they also sell them on Udemy, I prefer to buy them there and centralize all my courses. Otherwise, I end up scattering them across different platforms and forgetting what I have on each one.

One of the courses I chose is the one that gives its name to this article, "Godot 4 C# Action Adventure: Build your own 2.5D RPG" and it differs from others on Godot in that it focuses on development with C# instead of GDScript. GDScript has multiple advantages: it's very easy to learn and read, flexible, fast, and tightly integrated into the Godot editor. However, when coming from Unity, what you want is to smooth the learning curve as much as possible, and Godot's decision to support C# is a very smart way to ease the transition for Unity developers. Apart from saving you from having to learn another language, using C# has multiple additional advantages:

  1. Increases game performance. It's true that Godot games developed in C++ are faster, but games developed in Godot's C# are much faster than those using GDScript.
  2. Much better supported by IDEs. Godot's editor offers a lightweight version of an IDE for GDScript, but when coming from a fully-featured IDE like Visual Studio or Rider, Godot's built-in IDE falls very short. You end up missing the conveniences that a proper IDE offers by default. While you can also program GDScript in those IDEs, their support for it is very limited, and you still miss things. Ultimately, when you decide to program in C# in Godot, you can do it from your preferred IDE and feel right at home. Plus, Rider has an official plugin for Godot C# that makes the experience of using it with Godot very similar to using it with Unity.
  3. Opens the door to using third-party libraries. Unlike Unity, Godot allows you to integrate NuGet libraries into your project, minimizing the chances of having to reinvent the wheel.
  4. Greater code sophistication. GDScript is gradually maturing, but it still lacks many of the sophistications and abstractions that C# already offers. When coming from Unity, it's very difficult to give up many programming patterns that you've internalized in C#.

This course is one of the few that approaches Godot using C#, even though the C# developer community is one of the most vibrant in the engine's ecosystem.

Therefore, my main goal was not so much to learn new concepts as to put into practice what I already knew in a new engine, using C#. I wanted to see what the workflow could be like with C# and Godot. The result has been fully satisfactory. Not only did I find it very comfortable to work with Godot and C#, but I also learned a few tricks and concepts along the way.

The course focuses on programming a small 2.5D action game. The environments are in 3D, but the characters are 2D sprites, hence the 2.5D aspect. As for the RPG part in the title... well, it doesn't show up anywhere. Don't expect inventory management or skill tree management, as you would see in an RPG. The game ends up being purely action-based, focusing on attacking enemies with stabs and fleeing from them when they start to surround you. To add excitement to the battles, the game implements a couple of special attacks with bombs and lightning.

Things I've learned in this course:

  • To shape the environments, it teaches you how to generate MeshLibraries, which are like palettes of scenery objects. It seems that Godot doesn't yet support palettes spanning scenes (the equivalent of Unity's prefabs), but only meshes with an associated collider. However, that, combined with a grid system, allows you to shape the environments comfortably and fairly accurately. I found it a bit awkward to move around while the grid was active because the right mouse button, which is used in the rest of the editor for free movement through the environment, is used to delete objects when you're in grid mode.
  • Coming from Unity, I thought Godot's Node system was too granular. I didn't take long to get used to it. In the end, it turns out to be as comfortable, or even more so, than Unity's component system. The course explains it very well.
  • Godot's Input system is like a simplified version of Unity's New Input System. I appreciated that it's much easier to set up than Unity's, although it's also true that the game only requires simple key presses. It remains to be seen how it performs in games that require more complex controls.
  • In Godot, you won't miss Scriptable Objects. Here they're called Resources, and I've seen quite a few possibilities in them. The possibility, which the course teaches you, of dumping a resource to a file to use it as a shared repository for data among various scripts (decoupled from each other) seemed very powerful to me.
  • Godot has a node called AnimationTree, which is essentially a combination of Unity's Animator and Animator Controller (all in one). On the one hand, it's more limited in transitions between animations (I missed being able to choose at what point in the animation to exit the previous state and at what point in the next animation to land in the next state), but on the other hand, it's used through a method called travel(), which allows you to transition from one state to another from disparate points in the state graph using A* to choose the route. It also has parameters, like Unity's Animator Controller, but lacks triggers. The course doesn't talk about AnimationTrees, but instead chooses to create state machines through code and call animations directly. Despite that, I insisted on using AnimationTrees with the guards, to learn to use that node. My conclusion so far is that the similarities between Godot's AnimationTrees and Unity's AnimatorControllers are quite superficial. Although they're used for the same purpose, their handling is very different. If you insist on using an AnimationTree through parameters, as you would in Unity, you'll probably run into problems. You'll also miss triggers a lot. My feeling is that in the end, you have to replace the use of triggers with calls to travel(), and that AnimationTrees are much more confined to animations than AnimatorControllers, which seem more general-purpose.
  • Godot's navigation system is very easy to use. It's very similar to Unity's. If anything, I missed being able to define a step height for the agent in Godot's navigation system, which gave me problems with small steps that I had to replace with invisible ramps.
  • I missed Unity's Gizmos and Handles. The course doesn't cover this, but I looked into it on my own. In a first sweep, I didn't find anything obvious. There's some mention in the documentation, but I admit I still don't have a clear idea. I have to delve into it more.
  • The course taught me a combat system based on colliders (hit boxes and hurt boxes) that I hadn't thought of and that greatly simplifies other approaches I've used to implement sword combat.
  • Godot's user interface system is a piece of cake. Very easy to use. If you're coming from Unity, it's more similar to uGUI than the new UI Toolkit, although it's true that unlike uGUI, things are edited in its own editor rather than overlapping with the 3D view of the scene (which I've always found horrible in Unity).
  • Godot's signal and event system is very effective. It's true that in C#, it's not as straightforward as in GDScript, but once you get used to ending the definition of your events/signals with the suffix ...EventHandler(), everything goes well.
  • The course touches on shaders, but only provides an example of a simple shader implemented through code (Godot's version of GLSL). I would have liked it better if it had explained it using Godot's Visual Shaders (which it has), but I was left wanting. I'll have to find another course that covers it.
  • As for particle systems, they're very similar to Unity's.
Overall, not bad. The risk with these courses is that they're too basic. Fortunately, this one strikes a good balance between explaining the engine from scratch and reaching concepts that are interesting for people who already know other engines.

So, I recommend this course. I haven't regretted buying it and dedicating time to it. As for those of you who might be put off by the English, I'll mention that the Udemy course has English subtitles, so if you already read game development books in English, you won't have a hard time following the course. Plus, the instructor speaks very slowly, his pronunciation is very clear, and he uses very simple vocabulary. I, at least, haven't had any trouble following him.