It is very common for game characters to have progress bars, at their feet or above their heads, to show how much life they have left.
Godot has two ideal nodes for this: ProgressBar and TextureProgressBar. The first one has everything we might need for a basic bar. The second node is an evolution of the first, allowing for a more attractive visual appearance using textures instead of plain colors. In this tutorial, we will focus on ProgressBar; once you control this, using the TextureProgressBar node is relatively simple.
In Godot2D, adding a progress bar to your character is very simple. Just add the ProgressBar node to the character's scene hierarchy and then resize and position the bar using its visual handles.
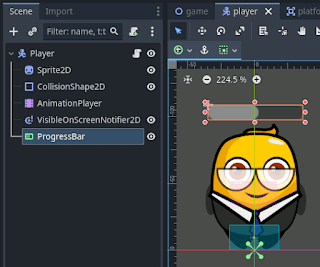
From there, you only need to configure the visual appearance of the bar and implement its script, as we will see later.
However, adding a life bar to a 3D game character is not so straightforward. The problem is that ProgressBar is a 2D node and cannot be directly added to a 3D game. In fact, if you try to add the node to a 3D game character, as we did with the 2D case, you will see that the scene editor switches to the 2D tab and does not allow you to place the node as part of your 3D scene.
The trick is to use a node we already used in the
article about minimaps in Godot: the
SubViewport node. This node creates an independent viewing area in a region of the screen. In the case of minimaps, we used it to show the top-down camera's view, while the rest of the screen continued showing what the main camera saw. In this case, the node's role will be to display a 2D element in a region of a 3D game screen.
For minimaps, the trick worked by making the Camera3D node a child of the SubViewport and placing this in the desired screen region using a SubViewportContainer node.
For life bars, it's done similarly: you place the ProgressBar node as a child of the SubViewport, but in this case, you can't use the SubViewportContainer node because it places things in a specific screen position and not relatively to a character, so they move with it through the scene. For this, we can use a Sprite3D node. This node can be positioned relatively to a character, as part of its scene hierarchy. So, we will make the SubViewport and ProgressBar nodes children of the Sprite3D.
Once finished, the life bar will still not be visible. This is because we need to configure the Sprite3D to show the life bar. In other words, we need to configure the Sprite3D to display the image rendered by the SubViewport. To do this, find the Texture property of the Sprite3D in the inspector. When you find it, it will be empty, so you need to create a New ViewportTexture in it and select our SubViewport in the popup window that appears. From that moment on, the bar will be visible within our character's scene.
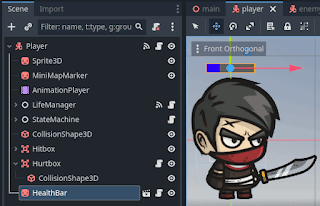
Normally, beyond tinkering for testing, you will want to concentrate all the bar nodes in their own scene, so you can reuse it for different characters. That’s what I did and what is shown in the previous screenshot.
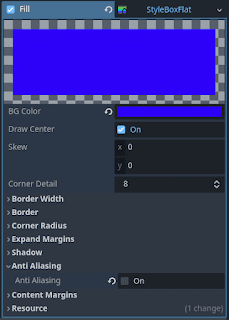
That’s the hardest part of configuring life bars. The next step is to configure the visual appearance of the bar. We will set its size using the Size property of the SubViewport. I usually disable the Show Percentage property of the ProgressBar to not show the percentage. As for the bar colors, we need to look for the Themes Overrides section in the ProgressBar inspector. There, we need to expand another section called Styles. It has two parts: Background and Fill. The first is for defining the visual appearance of the bar’s background, and the second for the main bar. The simplest way is to assign those properties with StyleBoxFlat resources and edit their BG Color property with the desired colors. For example, we could set the background BG Color to a color with Alpha 0, making it completely transparent, and the bar color to blue.
What remains is the logic to update the bar’s values as the character's values change.
The three basic properties of a ProgressBar are: MaxValue, MinValue, and Value. The first two are usually set at the beginning, for example in the _Ready() method, and define the maximum and minimum values the bar will cover. Meanwhile, the Value property is the one we will update throughout the game to make the ProgressBar update the bar length based on the Value relative to the minimum and maximum.
An approach I often follow is to create a C# script for the Sprite3D, with a reference to the ProgressBar:
From that reference, I create properties for the maximum, minimum, and current values, so when these values are modified from outside the script, their equivalents in the ProgressBar are also updated. For example, for the maximum value:
The properties for the minimum and current values are almost identical.
I exported these properties to set initial values from the inspector. For the configured inspector values to apply to the progress bar at the beginning of the game, we will use the _Ready() method:
Once the game starts, the properties will update the ProgressBar as the reference to it will no longer be null.
The remaining task is to provide a means to update the CurrentValue property and, with it, the bar. You can do this in many ways, for example, by having scripts that will update the bar hold a reference to the bar script and manipulate the CurrentValue property through it. This is a valid approach but increases coupling by requiring a direct reference between objects.
Another option, reducing coupling, is to make scripts that modify the life level emit signals (Godot's version of events) whenever a change occurs and have the bar subscribe to these signals. In my example, I followed this approach and included a handler in the bar script to respond to such signals:
Then, I subscribed that handler to the signal emitted by the character whenever it takes damage:
In my example, the damage signal is emitted by the CharacterLifeManager.cs script, which defines the signal as follows:
The previous signal is emitted from line 46 of the ApplyDamage() method of the aforementioned script, which is called whenever the character takes a hit from its opponents:
Using deltas, instead of absolute values, in the OnCurrentValueChanged() handler allows subscribing it not only to damage signals (which transmit negative deltas) but also to healing signals (whose deltas are positive). In this case, the script that manages healing, when the player picks up a potion, emits a signal with a positive delta to which we can subscribe just as we did with the damage signal:
The definition and launch of the signal are very similar to the damage signal, so I won't go over it here.
By relying on signals, we have reduced coupling between components and achieved a highly reusable bar that we can apply to any game element as long as it emits signals with the increment value (whether positive or negative) whenever a monitored value changes. This way, we can reuse this life bar we implemented here with other components to display values that don’t have to be life, such as ammo, karma, or armor level.
This concludes the article; I hope you liked it. If the explanations and screenshots were not enough, you can download the example project I used from my DungeonRPG repository on GitHub. I used as a base the mini-game I made following the GameDevTV course "Godot 4 C# Action Adventure: Build your own 2.5D RPG," which I highly recommend. The course does not cover life bars, but the mini-game it implements is an excellent base for learning how to create them.


